Engage NY Eureka Math Geometry Module 2 Lesson 6 Answer Key
Eureka Math Geometry Module 2 Lesson 6 Exercise Answer Key
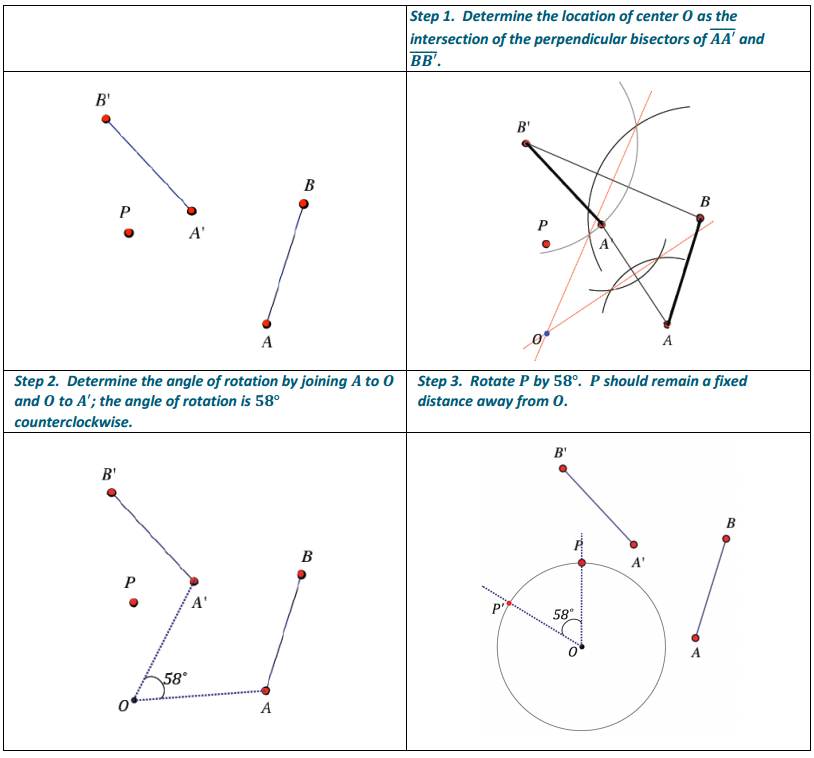
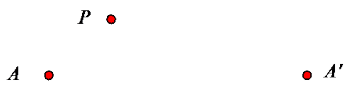
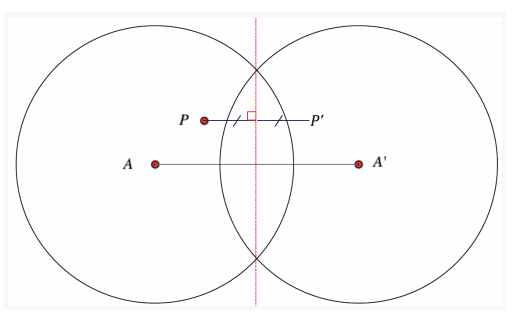
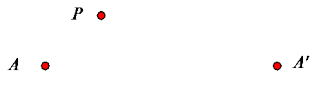
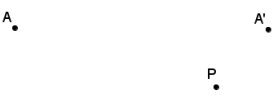
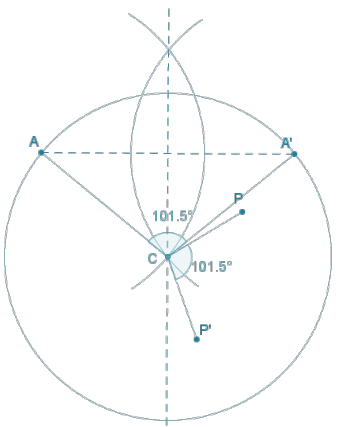
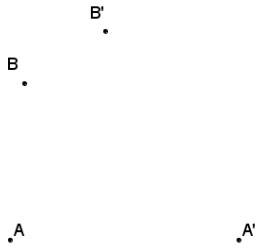
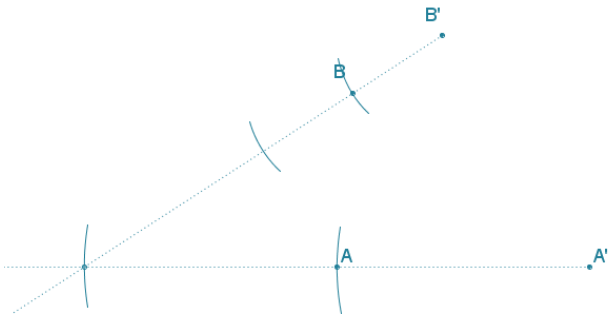
Exercise 1.
Find the center and the angle of the rotation that takes \(\overline{A B}\) to \(\overline{A^{\prime} B^{\prime}}\). Find the image P’ of point P under this rotation.
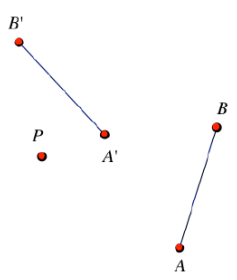
Answer:
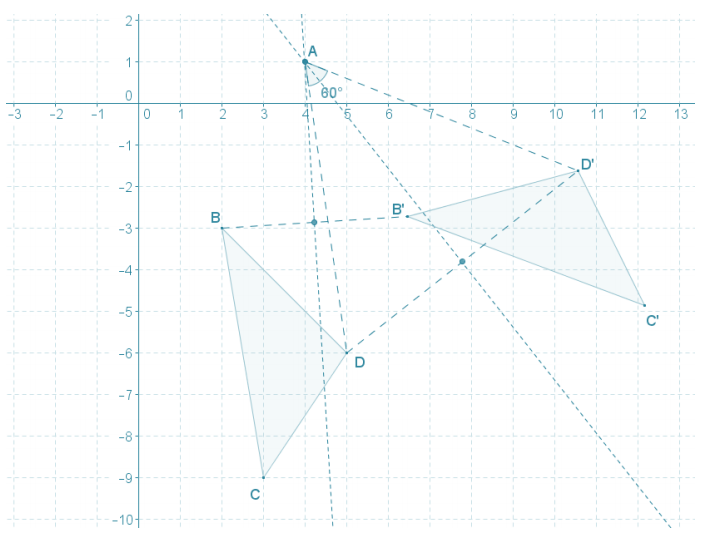
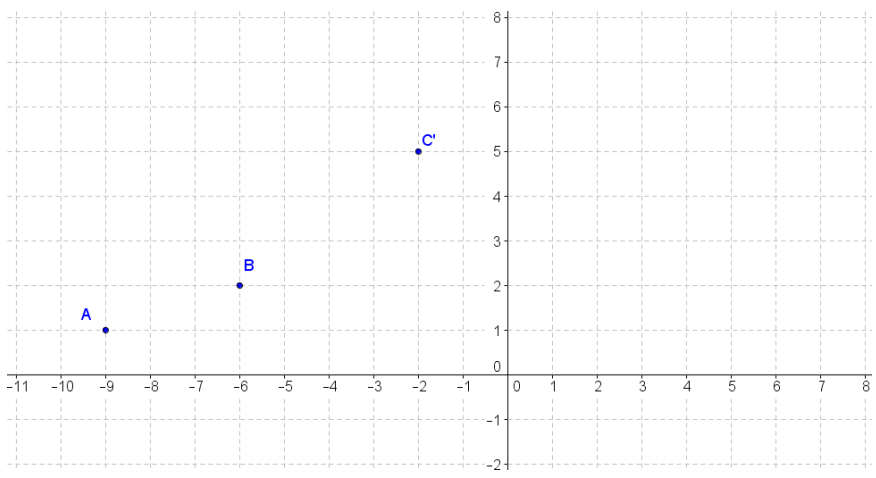
Exercise 2.
In the diagram below, ∆ B’C’D’ is the image of ∆ BCD after a rotation about a point A. What are the coordinates of A, and what is the degree measure of the rotation?
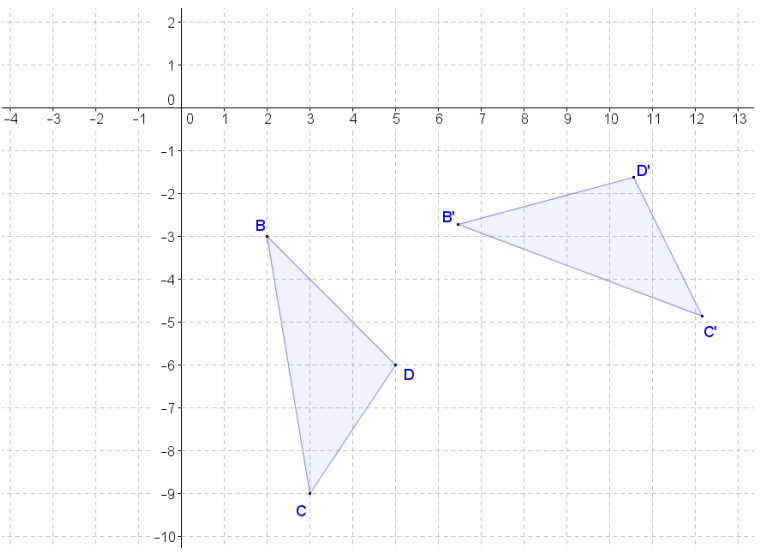
Answer:
By constructing the perpendicular bisector of each segment joining a point and its image, I found the center of dilation A to be A(4, 1). Using a protractor, the angle of rotation from ∆ BCD to ∆ B’C’D’ about point A(4, 1) is 60°.
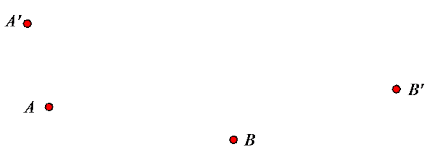
Exercise 3.
Find the line of reflection for the reflection that takes point A to point A’. Find the image P’ under this reflection.
Answer:
Exercise 4.
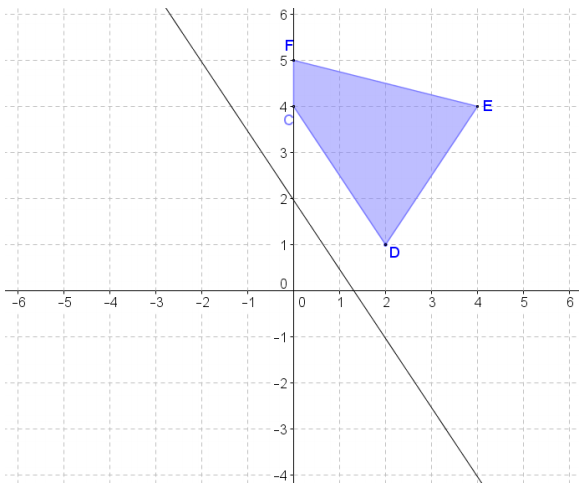
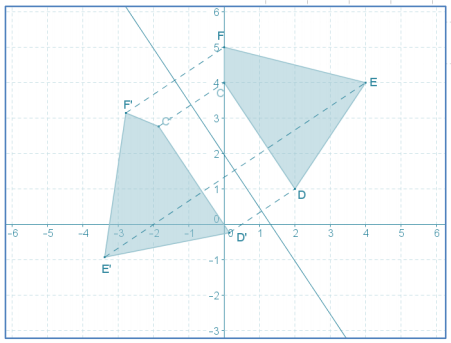
Quinn tells you that the vertices of the image of quadrilateral CDEF reflected over the line representing the equation y = –\(\frac{3}{2}\)x + 2 are the following: C’(-2, 3), D’(0, 0), E’(-3, -3), and F’(-3, 3). Do you agree or disagree with Quinn? Explain.
Answer:
I disagree because under a reflection, an ima ge point lies along a line through the pre-image point that is perpendicular to the line of reflection. The line representing the equation y = \(\frac{2}{3}\)x + 4 includes C and is perpendicular to the line of reflection; however, it does not include the point (-2, 3). Similar reasoning can be used to show that Quinn’s coordinates for D’, E’, and F’ are not the images of D, E, and F, respectively, under a reflection over y = –\(\frac{3}{2}\)x + 2.
Exercise 5.
A translation takes A to A’. Find the image P’ and pre-image P” of point P under this translation. Find a vector that describes the translation.
Answer:

Exercise 6.
The point C’ is the image of point C under a translation of the plane along a vector.
a. Find the coordinates of C if the vector used for the translation is \(\overrightarrow{B A}\).
Answer:
C(1, 6)
b. Find the coordinates of C if the vector used for the translation is \(\overrightarrow{A B}\).
Answer:
C(-5, 4)
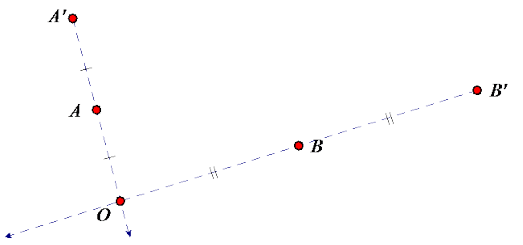
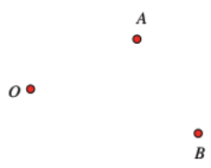
Exercise 7.
A dilation with center O and scale factor r takes A to A’ and B to B’. Find the center O, and estimate the scale factor r.
Answer:
The estimated scale factor is r ≈ 2.
Exercise 8.
Given a center O, scale factor r, and points A and B, find the points A’ = Do,r(A) and B’ = Do,r(B). Compare length AB with length A’B’ by division; in other words, find \(\frac{A^{\prime} B^{\prime}}{A B}\) How does this number compare to r?
r = 3
Answer:
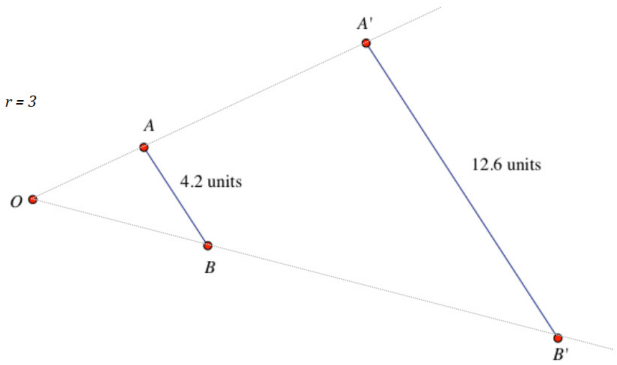
\(\frac{A^{\prime} B^{\prime}}{A B}=\frac{12.6}{4.2}\) = 3 = r
Exercise 9.
Given a center O, scale factor r, and points A, B, and C, find the points A’ = Do,r(A), B’ = Do,r(B), and C’ = Do,r(C). Compare m∠ABC with m∠A’B’C’. What do you find?
r = 3
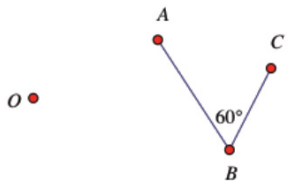
Answer:
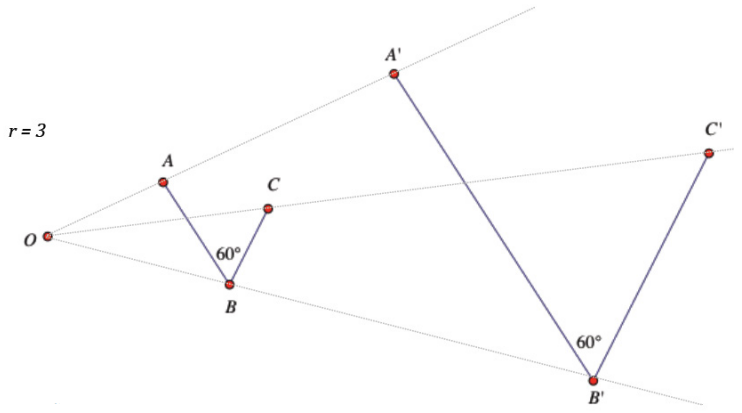
The angle measurements are equal.
Eureka Math Geometry Module 2 Lesson 6 Problem Set Answer Key
Question 1.
In the diagram below, A’ is the image of A under a single transformation of the plane. Use the given diagrams to show your solutions to parts (a) – (d).
a. Describe the translation that maps A → A’, and then use the translation to locate P’, the image of P.
Answer:

The translation that maps A → A’ is along horizontal vector \(\overrightarrow{A A^{\prime}}\)
b. Describe the reflection that maps A → A’, and then use the reflection to locate P’, the image of P.
Answer:
The reflection that maps A → A’ is across the
perpendicular bisector of \(\overline{\boldsymbol{A A}^{\prime}}\).
c. Describe a rotation that maps A → A’, and then use your rotation to locate P’, the image of P.
Answer:
There are many possible correct answers to this part. The center of rotation C must be on the perpendicular bisector of \(\overline{\boldsymbol{A A}^{\prime}}\) and the radius CA ≥ \(\frac{1}{2}\)AA’.
d. Describe a dilation that maps A → A’, and then use your dilation to locate P’, the image of P.
Answer:
There are many possible correct answers to this part. The center of dilation must be on ![]() . If the scale factor chosen is r > 1, then A must be between O and A’. If the scale factor chosen is r < 1, then A’ must be between A and O, and OP’ = r(OP). The sample shown below uses a scale factor r = 2.
. If the scale factor chosen is r > 1, then A must be between O and A’. If the scale factor chosen is r < 1, then A’ must be between A and O, and OP’ = r(OP). The sample shown below uses a scale factor r = 2.

Question 2.
On the diagram below, O is a center of dilation, and ![]() is a line not through O. Choose two points B and C on
is a line not through O. Choose two points B and C on ![]() between A and D.
between A and D.

a. Dilate A, B, C, and D from O using scale factor r = \(\frac{1}{2}\). Label the images A’, B’, C’, and D’, respectively.
b. Dilate A, B, C, and D from O using scale factor r = 2. Label the images A”, B”, C”, and D”, respectively.
c. Dilate A, B, C, and D from O using scale factor r = 3. Label the images A”’, B”’, C”’, and D”’, respectively.
Answer:
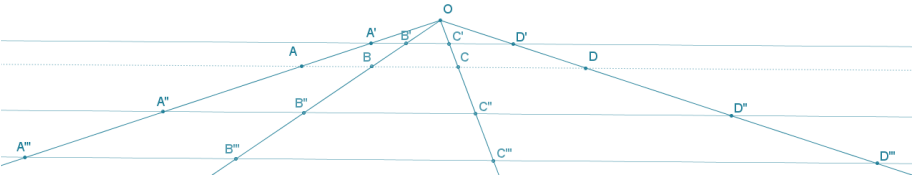
d. Draw a conclusion about the effect of a dilation on a line segment based on the diagram that you drew. Explain.
Answer:
Conclusion: Dilations map line segments to line segments.
Question 3.
Write the inverse transformation for each of the following so that the composition of the transformation with its inverse maps a point to itself on the plane.
a. \(T_{\overrightarrow{A B}}\)
Answer:
The inverse of a translation along the vector \(\overrightarrow{A B}\) would be a translation along the vector \(\overrightarrow{B A}\) since this vector has the same magnitude but opposite direction. This translation maps any image point to its pre-image.
b.
![]()
Answer:
The inverse of a reflection over line AB is the same reflection. The points P and ![]() (P) are symmetric about
(P) are symmetric about ![]() , so repeating the reflection takes a point back to itself.
, so repeating the reflection takes a point back to itself.
C. Rc,45
Answer:
The Inverse of a 45° rotatIon about a point C would be a rotation about the same point C of – 45°, the opposite rotational direction.
d. Do,r
Answer:
The inverse of a dilation with center O and scale factor r would be a dilation from center O with a scale factor of \(\frac{1}{r}\). Point A in the plane is distance OA from the center of dilation O, and its image A’ would, therefore, be at a distance r(OA)from O. A dilation of A’ with scale factor \(\frac{1}{r}\) would map the A’ to a point that is a distance \(\frac{1}{r}\) (OA) = \(\frac{1}{r}\) (r(OA)) = 1(OA) = OA. By the definition of a dilation, points and their images lie on the same ray that originates at the center of the dilation. There is only one point on that ray at a distance OA from O, which is A.
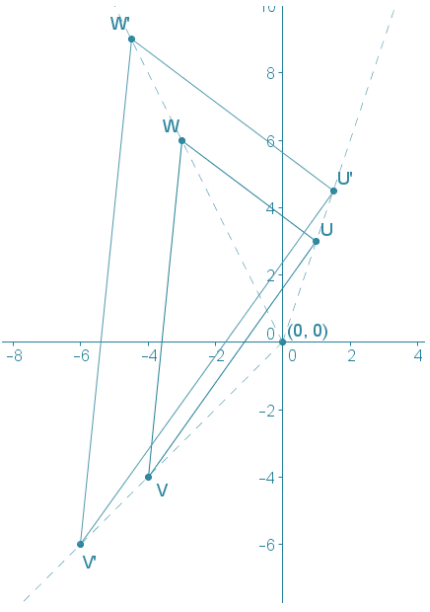
Question 4.
Given U(1, 3), V(- 4, – 4), and W(- 3, 6) on the coordinate plane, perform a dilation of ∆ UVW from center 0(0, 0) with a scale factor of \(\frac{3}{2}\). Determine the coordinates of images of points U, V, and W, and describe how the coordinates of the image points are related to the coordinates of the pre-image points.
Answer:
Under the given dilation, U, V, and W map to U’, V’, and W’, respectively. U’\(\left(\frac{3}{2}, \frac{9}{2}\right)\), V’(-6, -6), and W’ (-\(\frac{9}{2}\), 9). For each point (X, Y) on the coordinate plane, its image point is \(\left(\frac{3}{2} X, \frac{3}{2} Y\right)\) under the dilation from the origin with scale factor \(\frac{3}{2}\).
Question 5.
Points B, C, D, E, F, and G are dilated images of A from center O with scale factors 2, 3, 4, 5, 6, and 7, respectively. Are points Y, X, W, V, U, T, and S all dilated images of Z under the same respective scale factors? Explain why or why not.
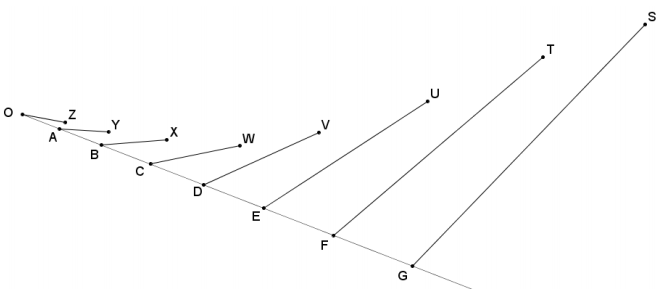
Answer:
If points Y, X, W, V, U, T, and S were dilated images of Z, the images would all be collinear with O and Z; however, the points are not all on a line, so they cannot all be images of point Z from center O. We also know that dilations preserve angle measures, and it is clear that each segment meets \(\overrightarrow{O A}\) at a different angle.
Question 6.
Find the center and scale factor that takes A to A’ and B to B’, If a dilation exists.
Answer:
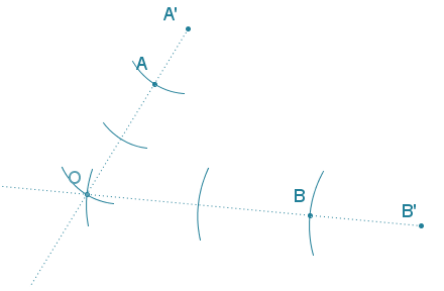
The center of the dilation is O, and the scale factor is \(\frac{3}{2}\).
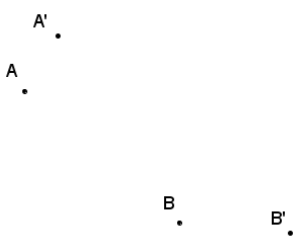
Question 7.
Find the center and scale factor that takes A to A’ and B to B’, If a dilation exists.
Answer:
After drawing \(\overline{\boldsymbol{B}^{\prime} \boldsymbol{B}}\) and \(\overline{\boldsymbol{A}^{\prime} \boldsymbol{A}}\), the rays converge at a supposed center; however, the corresponding distances are not proportional since \(\frac{O A^{\prime}}{O A}\) = 2 and \(\frac{O B^{\prime}}{O B}=\) ≠ 2. Therefore, a dilation does not exist that maps A → A’ and B → B’.
It also could be shown that \(\overline{A B}\) and \(\overline{A^{\prime} B^{\prime}}\) are not parallel; therefore, the lengths are not proportional by the triangle side splitter theorem, and there is no dilation.
Eureka Math Geometry Module 2 Lesson 6 Exit Ticket Answer Key
Question 1.
Which transformations of the plane are distance-preserving transformations? Provide an example of what this property means.
Answer:
Rotations, translations, and reflections are distance-preserving transformations of the plane because for any two different points A and B In the plane, if F is a rotation, translation, or reflection that maps A → F(A) and B → F(B), AB = F(A)F(B).
Question 2.
Which transformations of the plane preserve angle measure? Provide one example of what this property means.
Answer:

Question 3.
Which transformation is not considered a rigid motion and why?
Answer:
A dilation is not considered a rigid motion because it does not preserve the distance between points. Under a dilation D0, where r ≠ 1, Do,r(A) = A’ and Do,r(B) = B’, A’B’ = r(AB), which means that \(\overline{A^{\prime} B^{\prime}}\) must have a length greater or less than \(\overline{A B}\).