Practicing the Bridges in Mathematics Grade 4 Student Book Answer Key Unit 8 Module 1 will help students analyze their level of preparation.
Bridges in Mathematics Grade 4 Student Book Answer Key Unit 8 Module 1
Bridges in Mathematics Grade 4 Student Book Unit 8 Module 1 Session 1 Answer Key
Playground Safety
Question 1.
Ms. Li’s class took a vote on what they thought might be unsafe playground equipment. Their data is shown below.
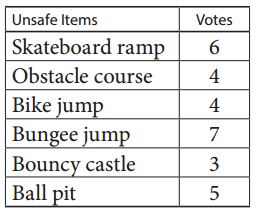
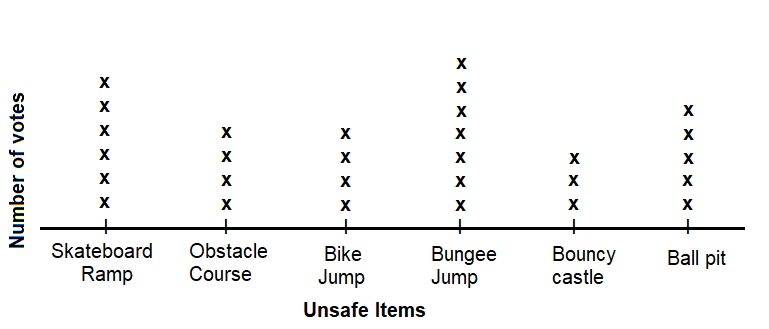
a. Make a line plot of their data. Label the horizontal axis and give the graph a title.
Answer:
Explanation:
A line plot is a graph that displays data with the help of symbols above a number line showing the frequency of each value as shown above.
b. What is the range of the voting data?
Answer:
4
Explanation:
We know that, range is the difference of number of least votes in the game and number of highest votes in the game.
Number of votes in Bungee Jump = 7
Number of votes in Bouncy Castle = 3
Range = 7 – 3 = 4
c. What is the mode of the data?
Answer:
4,
Explanation:
We know that, mode is the number that appears most often in a set of data. Arrange the data from least to greatest to find mode. 3, 4, 4, 5, 6, 7, mode = 4.
d. What item(s) do you think Ms. Li’s students removed from their list of potential playground equipment? Explain your reasoning.
Answer:
Bungee jump and Skateboard ramp,
Explanation:
Ms. Li’s students voted more to removed from their list of potential playground equipment are Bungee jump and Skateboard ramp items.
Bridges in Mathematics Grade 4 Student Book Unit 8 Module 1 Session 2 Answer Key
Grassy Field
Question 1.
What does our grass need to grow and thrive?
Answer:
Soil and water,
Explanation:
We know that plants or grass need adequate amount of soil, light and water to grow and thrive.
Question 2.
Which items will cost money?
Answer:
Soil, grass seed and water,
Explanation:
Soil, Light and water are natural resources, but sometimes we need to buy like:
• soil – $3.00 per 100 kilograms
• grass seed – $1.00 per 1000 square yards
• water – 1 cent per gallon
So, soil, grass seed and water will cost money.
Question 3.
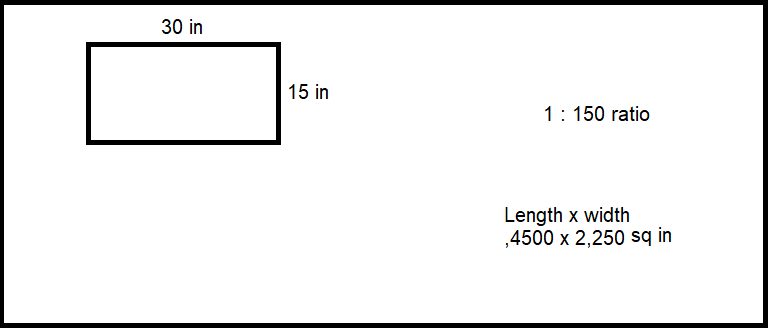
What are the dimensions of 1 carton? Record them below in inches and centimeters.
Customary: ______________ in. × ______________ in.
Metric: ______________ cm × ______________ cm
Answer:
Customary: 12 in. X 6 in.,
Metric: 30 cm X 15 cm,
Explanation:
The dimensions of 1 carton, recorded as below in inches and centimeters.
Customary: 12 in. X 6 in.,
Metric: 30 cm X 15 cm,
Question 4.
What are the possible rectangular arrangements of our field if we have cartons? Circle the arrangement the class will use.
Answer:
Rectangle : Length X Width,
Rectangle : 12 in. X 6 in.,
Rectangle : 30 cm X 15 cm,
Explanation:
The possible rectangular arrangements of our field if we have cartons are:
Rectangle : Length X Width,
Rectangle : 12 in. X 6 in.,
Convert inches to centimeters.
1 inch = 2.54 or 3 cm,
Rectangle : 30 cm X 15 cm.
Question 5.
Sketch the rectangle of our field below. What are the actual dimensions of our field in inches? Label them on your sketch. Show all your work.
What is the area of our small field in square inches? Show all your work.
Answer:
Explanation:
Given length = 30 in. and breadth = 15 in. the area of our small field in square inches.
Area = length X breadth, Area of model field = 30 X 15 = 450 square in.
Question 6.
What is the mass of soil contained in 1 carton? Record it below.
Answer:
5,400 g,
Explanation:
From the above given information the mass of soil contained in 1 carton 5,400 g.
Question 7.
Describe how you found the mass of the soil that fills 1 carton.
Answer:
Volume of the carton X soil filled in the carton,
Explanation:
We find the mass of the soil by multiplying the Volume of the carton and soil filled in the carton.
a. What is the mass of the soil we used for our entire field? Show all your work.
Answer:
Explanation:
8,10,000 grams,
Explanation:
The mass of the soil we used for our entire field is 5,400 g X 150 = 8,10,000 grams.
Grass Data Log
Question 1.
Record the data you collect each day in the table below.
- You do not need to water the grass every day, just when the soil is dry to the touch.
- If you do not water the grass, write 0 in the water amount column for that day.
- Write 0 in the height column until the grass starts to grow.
- When the grass begins to grow, measure the height of the tallest blade of grass.
Answer:
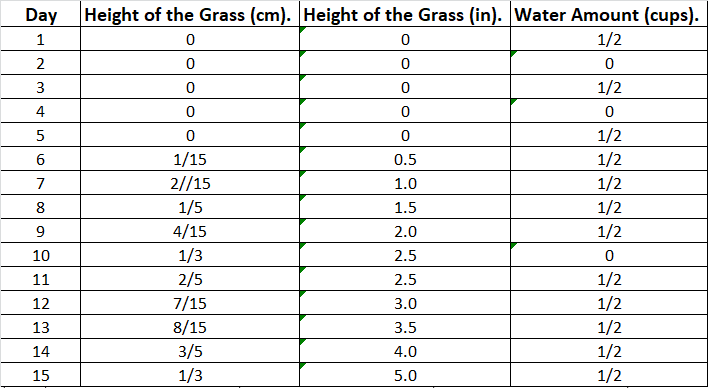
Explanation:
From the above given instructions given above, the data is recorded randomly.
You do not need to water the grass every day, just when the soil is dry to the touch.
If you do not water the grass, write 0 in the water amount column for that day.
Write 0 in the height column until the grass starts to grow. When the grass begins to grow, measure the height of the tallest blade of grass.
Our Grassy Field
Record the length of one side of the base of a carton: Our small field has _____________ cartons arranged in a(n) ____________ × ___________ rectangle.
Question 1.
What is the length and width of our small field in centimeters? Sketch the rectangular field and label the dimensions below. Show all your work.
Answer:

Explanation:
Given length = 30 cm, breadth = 15 cm. the area of our small field in square centimeters.
Area = length X breadth, Area of model field = 30 X 15 = 450 square cm.
Question 2.
What is the area of our small field in square centimeters? Show all your work.
Answer:
450 square cm,
Explanation:
Area of a rectangle = Length X Width, l = 30 cm; b = 15 cm, A = 30 X 15, A = 450 square cm.
Question 3.
Why is it important to calculate the dimensions and area of our small field?
Answer:
To know how much grass seed need to sow,
Explanation:
Area is a measure of how much space there is inside a shape. Calculating the area of a shape or surface can be useful in everyday life for example you may need to know how much grass seed you need to sow.
Question 4.
Solve the following problems.
50 × (6 + 4) = _____________
(7 + ___________) × 50 = 500
7 × (3 + 50) = _____________
___________ = 50 × (4 + 16)
Answer:
50 X (6 + 4) = 500,
(7 + 3) X 50 = 500,
7 X (3 + 50) = 371,
1,000 = 50 X (4 + 16),
Explanation:
According to BODMAS rule, the brackets have to be solved first then Division, Multiplication, Addition, and at the end Subtraction.
50 X (6 + 4) = 500,
50 X 10 = 500,
(7 + 3) X 50 = 500,
10 X 50 = 500,
7 X (3 + 50) = 371,
7 X 53 = 371,
1,000 = 50 X (4 + 16),
50 X 20 = 1,000.
Bridges in Mathematics Grade 4 Student Book Unit 8 Module 1 Session 3 Answer Key
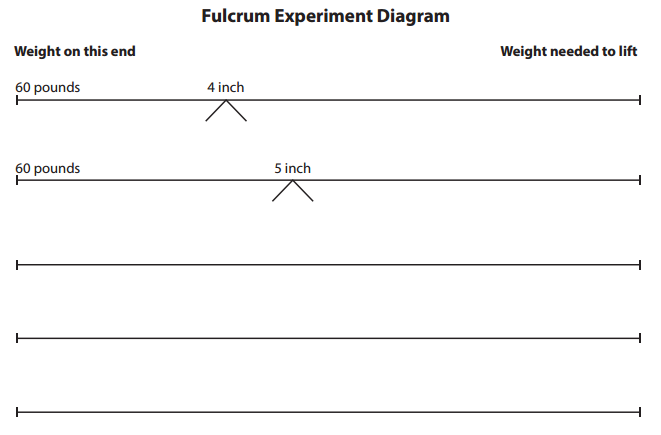
Fulcrum Investigation
Set up your seesaw experiment like the picture.

Question 1.
Investigate what happens when you move the fulcrum.
Record your predictions and results below.
Answer:
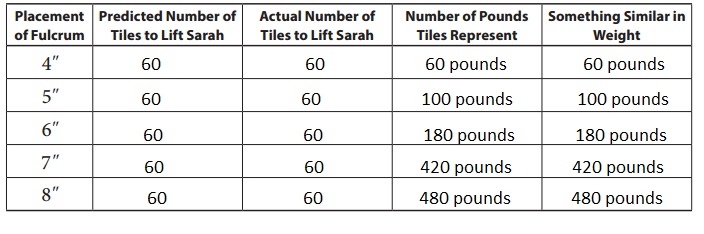
Explanation:
Investigated what happens when we move the fulcrum. Recorded my predictions and results above.
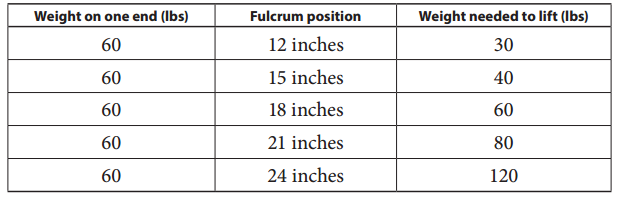
Question 2.
What do you notice about the data for the 4-inch and 8-inch placements?
Answer:
Changes in the weight,
Explanation:
When the placement of fulcrum from 4-inch and 8-inch there is change in number of pounds from 60 pounds to 480 pounds.
Question 3.
Complete the diagram below to show your results.
Answer:
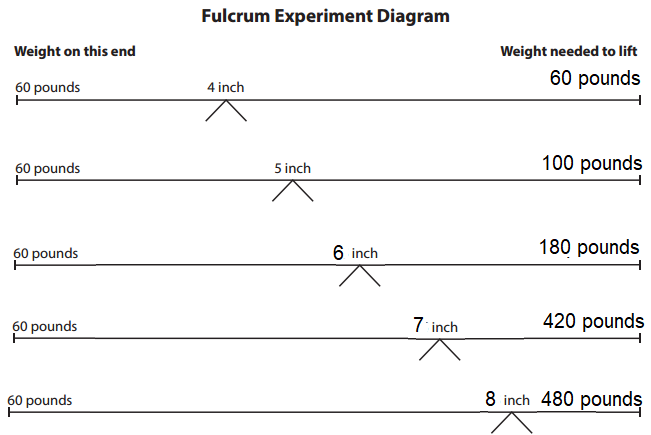
Explanation:
Fulcrum balance at center load X length = load X length, load = 60, length center = 4 (for total distance 8 inches), 60 X 4 = 4 X load(w), 60 pounds, 60 X 5 = 3 X load(w), load(w) = 60 X 5 /3 = 20 X 5 = 100 pounds, 60 X 6 = 2 X load(x), load(x) = 60 X 6 /2 = 30 X 6 = 180 pounds, 60 X 7 = 1 X y, load(y) = 60 X 7 /1 = 60 x 7 = 420 pounds, 60 X 8 = load(z), load(z) = 60 x 8 = 480 pounds, Set your fulcrum on the ground and place the ruler on top. The fulcrum should sit in the middle of the ruler. Place the heavy object on one end of the ruler. This will cause the ruler to tilt down and touch the floor on that end.
Question 4.
What does the data tell you? Write at least two observations.
Answer:
1. Fulcrum is close, less effort,
2. Fulcrum is close to effort, load will move a greater distance,
Explanation:
According to the fulcrum theory and two observations are:
1. If the fulcrum is closer to the load, then less effort is needed to move the load.
2. If the fulcrum is closer to the effort, then the load will move a greater distance.
Use the results of your investigations and your seesaw materials to answer the following questions.
Question 5.
Sarah is seesawing with a 7th grader who weighs 100 pounds. Where should she place the fulcrum to lift and balance the 7th grader? Explain your reasoning.
Answer:
5 inches,
Explanation:
As Sarah is seesawing with a 7th grader who weighs 100 pounds. Where should she place the fulcrum to lift and balance the 7th grader is by seeing the fulcrum table it should be placed at 5 inches.
Question 6.
Sarah has a first-grade friend who weighs 40 pounds. Where should she place the fulcrum to balance with the 1st grader? Explain your reasoning.
Answer:
Below 4 inches,
Explanation:
As Sarah has a first-grade friend who weighs 40 pounds. Where should she place the fulcrum to balance with the 1st grader is by seeing the fulcrum table it should be placed below 4 inches.
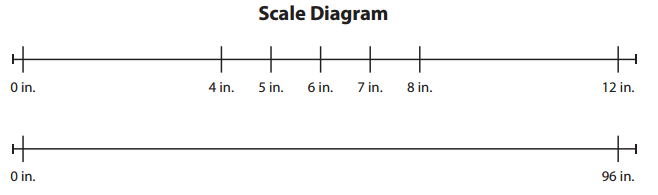
Scale Diagram
The real seesaw is 8 feet long. Our model seesaw is 12 inches long.
Question 1.
How many inches long is the real seesaw? Show your work using word, numbers or labeled sketches.
Answer:
The real seesaw is 8 feet long,
Explanation:
As given the real seesaw is 8 feet long.
Question 2.
How does that compare to our model seesaw?
Answer:
1 feet = 12 inches, Model seesaw is 1 feet long,
Explanation:
As we know 1 feet = 12 inches so model seesaw is 1 feet long.
Question 3.
Look at the partially completed Scale Diagram below. Fill in the rest of the diagram to help find where to place the fulcrum on the real seesaw.
Answer:
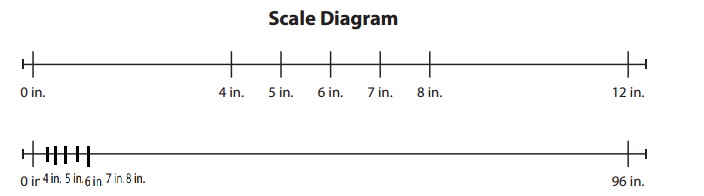
Explanation:
Filled in the rest of the diagram to help find where to place the fulcrum on the real seesaw above.
Use your data, the Fulcrum Experiment Diagram, and the Scale Diagram to help you answer the following questions.
Question 4.
Where should we place the fulcrum on the real seesaw for Sarah to balance with another 60-pound 4th grader?
a. How many feet is that from the end of the seesaw?
Answer:
92 inches or \(\frac{92}{12}\) feet or 7\(\frac{8}{12}\),
Explanation:
As we place the fulcrum on the real seesaw for Sarah to balance with another 60-pound 4th grader is 4 inches so it is 96 inches – 4 inches = 92 inches in feet it is \(\frac{92}{12}\) feet or 7\(\frac{8}{12}\).
Question 5.
Where should we place the fulcrum on the real seesaw for Sarah to balance with a 40-pound first grade student?
a. How many feet is that from the end of the seesaw?
Answer:
93 inches or \(\frac{93}{12}\) feet or 7\(\frac{9}{12}\),
Explanation:
As we place the fulcrum on the real seesaw for Sarah to balance with a 40-pound first grade student is less than 4 inches approximately 3 inches so it is 96 inches – 3 inches = 93 inches in feet it is \(\frac{93}{12}\) feet or 7\(\frac{9}{12}\).
Question 6.
Sarah’s 160-pound teenaged brother wants to balance with Sarah. Where should we place the fulcrum on the real seesaw?
a. How many feet is that from the end of the seesaw?
Answer:
90 inches or \(\frac{90}{12}\) feet or 7\(\frac{6}{12}\),
Explanation:
As Sarah’s 160-pound teenaged brother wants to balance with Sarah. We should place the fulcrum on the real seesaw is nearly 180 pounds so we take approximately 6 inches so it is
96 inches – 6 inches = 90 inches in feet it is \(\frac{90}{12}\) feet or 7\(\frac{6}{12}\).
Question 7.
CHALLENGE If Sarah can’t move the fulcrum from the middle of the seesaw, what can she do to balance with the 40-pound first grader? Why does this method work?
Answer:
She can increase the weight up to 180 pounds, It brings fulcrum to the middle,
Explanation:
As if Sarah can’t move the fulcrum from the middle of the seesaw, she can do to balance with the 40-pound first grader to 180 pounds, If it is 180 pounds then the fulcrum (6 inches) will be in the middle of the seesaw.
Twelve-Foot Seesaw
Question 1.
Ms. Li’s class conducted an experiment with a model seesaw using a pencil, yardstick, and tiles. Their results are in the table below.
Answer:
The results are shown on the table above,
Explanation:
Ms. Li’s class conducted an experiment with a model seesaw using a pencil, yardstick, and tiles. Their results are shown in the table above.
Question 2.
The real seesaw on their playground is 12 feet long. Their model seesaw is 36 inches long.
a. How many inches long is the real seesaw? Show all your work.
Answer:
108 inches long is the real seesaw,
Explanation:
Given the real seesaw on their playground is 12 feet long. Their model seesaw is 36 inches long as 1 feet = 12 inches so 12 feet = 12 X 12 inches = 144 inches, therefore many inches long the real seesaw is 144 inches – 36 inches = 108 inches.
b. How does that compare to the length of their model seesaw?
Answer:
The real seesaw is 9 times more than their model seesaw,
Explanation:
As real seesaw is 144 inches and model seesaw is 36 inches more long the real seesaw is 144 inches – 36 inches = 108 inches in feet is 108/12 = 9 times more than model seesaw.
Question 3.
Where should they place the fulcrum on the real seesaw for a 60-pound 4th grader to balance with a 120-pound high school student? Show your work.
Answer:
189 inches,
Explanation:
Asking where should they place the fulcrum on the real seesaw for a 60-pound 4th grader as table it is 18 inches to balance with a 120-pound high school student which is 24 inches from table so it is (18 inches + 24 inches)/2 = 21 inches as the real seesaw is 9 times more than their model seesaw it is 21 inches X 9 = 189 inches.
Question 4.
CHALLENGE Where do you think they should place the fulcrum on the real seesaw to lift a toddler who weighs 20 pounds? Explain your thinking.
Answer:
81 inches,
Explanation:
As if they think they should place the fulcrum on the real seesaw to lift a toddler who weighs 20 pounds as per table it is increasing 3 inches for every 10 pounds so for 20 pounds it is 12 inches – 3 inches = 9 inches and as the real seesaw is 9 times more than their model seesaw it is 9 inches X 9 = 81 inches.
Bridges in Mathematics Grade 4 Student Book Unit 8 Module 1 Session 4 Answer Key
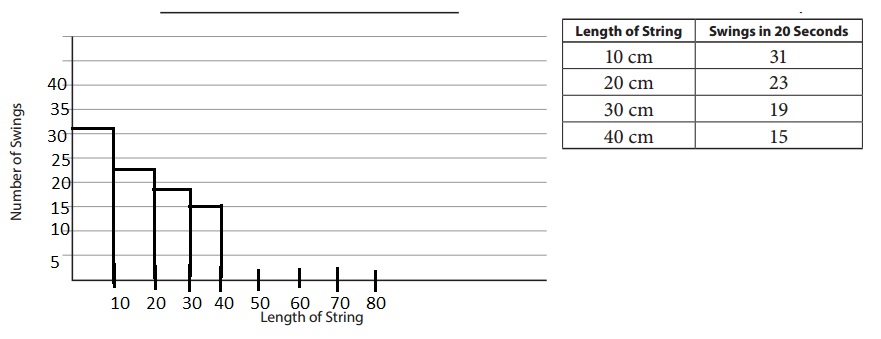
Pendulum Swing
Follow these directions to set up your pendulum swing.
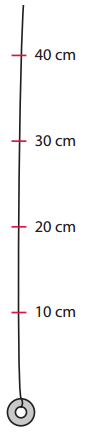
- Cut a piece of string 60 cm long. Tie a washer to the end of the string.
- Use a ruler to measure 10 cm from the top of the washer along the string and make a mark with your colored marker. Then measure from that mark another 10 cm up the string and make a mark. Continue to make marks every 10 cm.
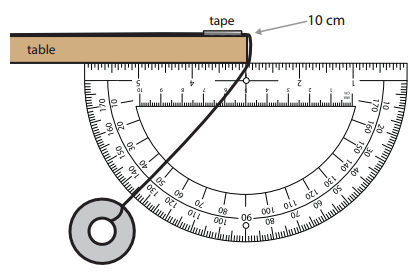
- Tape the pendulum string to the edge of your table at the 10 cm mark. Place the tape close to the edge.
- One team member holds a protractor behind the string and against the bottom of your table. Make sure the string lines up with the 90° line.
- Another team member pulls the washer to the side at a 45° angle, then lets go. Make sure the pendulum swings freely and doesn’t hit anything.
Conducting the Length Experiment
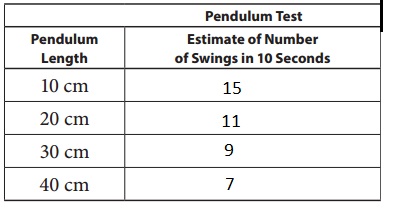
Question 1.
Write your prediction for the number of times you think the pendulum will swing back and forth in 10 seconds. Record your estimate in the table.
- One team member times the swing for 10 seconds, one holds the protractor, and the other counts the actual number of back and forth swings.
- Line up the string at the 45° angle mark, let go, and start counting. Record the actual number of swings in the table.
Answer:
Explanation:
Wrote my prediction for the number of times I think the pendulum will swing back and forth in 10 seconds. Recorded my estimate in the table above.
Question 2.
Now move the pendulum swing to the 20- centimeter mark and re-tape it to the table. Predict how many times you think the pendulum will swing back and forth. Record your estimate in the table.
- Change jobs to time the swing for 10 seconds, hold the protractor and count the actual number of back and forth swings.
- Line up the string at the 45° angle mark, let go, and start counting. Record the actual number of swings in the table.
- Repeat the same process for the 30- and 40- centimeter lengths.
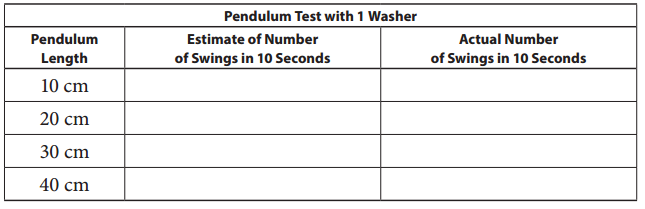
Answer:
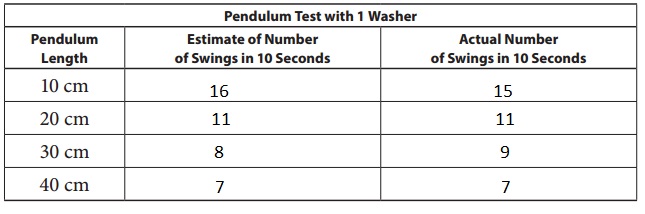
Explanation:
Recorded the actual number of swings in the table as shown above.
Question 3.
Does the length of the string affect the number of swings?
Answer:
Yes,
Answer:
As the length of the string increases the number of swings got decreased.
Question 4.
Describe at least two things you notice about the data.
Answer:
1. Length of string increases the number of swings got decreased,
2. Estimate number of swings is almost equal to actual number of strings,
Explanation:
Two things that I notice about the data is
1. Length of string increases the number of swings got decreased,
2. Estimate number of swings is almost equal to actual number of strings,
Conducting the Weight Experiment
Tie or tape another washer next to the washer on your pendulum. Make sure the distance from the washers to the first mark on the string is still 10 cm.
Question 5.
Write your prediction for the number of times you think the pendulum with 2 washers will swing back and forth in 10 seconds. Record your estimate in the table.
- One team member times the swing for 10 seconds, one holds the protractor, and the other counts the actual number of back and forth swings.
- Line up the string at the 45° angle mark, let go, and start counting. Record the actual number of swings in the table.
- Repeat the same process for the 20-, 30-, and 40-centimeter lengths.
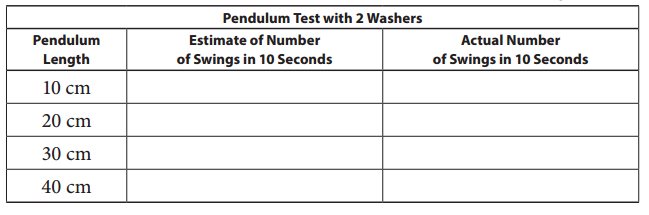
Answer:
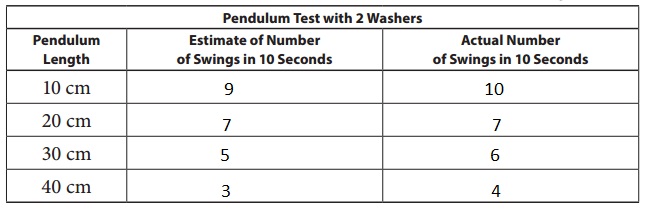
Explanation:
Wrote my prediction for the number of times I think the pendulum with 2 washers will swing back and forth in 10 seconds. Recorded my estimated in the table above.
Question 6.
Compare the two sets of data, and describe at least two things you notice about them.
Answer:
1. Length of pendulum increases the number of swings decreases,
2. Both the estimate number of swings and actual number of swings,
Explanation:
The two things noticed from the data is
1. Length of pendulum increases the number of swings decreases,
2. Both the estimate number of swings and actual number of swings.
Pendulum Graphing
Question 1.
Look at the pattern on the graph. Predict the number of swings of a pendulum with a string that is 50 centimeters in length. Explain your reasoning.
Answer:
5 swings,
Explanation:
Looking at the pattern the number of swings of a pendulum with a string that is 50 centimeters in length s 5 swings.
Question 2.
How can we set up our new playground so the older students can swing faster and the younger students can swing more slowly?
Answer:
Older students the length of the strings should be small, Younger students the length of the strings should be large,
Explanation:
To set up our new playground so the older students can swing faster and the younger students can swing more slowly we have to make older students the length of the strings should be small and younger students the length of the strings should be large.
Another Pendulum Swing Experiment
Question 1.
Ms. Li’s class tested a different variable on a pendulum swing. Instead of starting the pendulum at a 45° angle, they tried a 70° angle. They also let the pendulum swing for a longer time—20 seconds instead of only 10. Their results are below.
a. Make a bar graph that relates the number of swings (on the vertical axis) to the string length (on the horizontal axis).
b. Look at the graph. Predict the number of swings a pendulum with a string that is 50 centimeters in length will make in 20 seconds.
Answer:
Number of swings a pendulum with a string that 50 centimeters in length will make in 20 seconds,
Explanation:
Made a bar graph that relates the number of swings (on the vertical axis) to the string length (on the horizontal axis)above. Looking at the graph. The number of swings a pendulum with a string that is 50 centimeters in length will make in 20 seconds is 9 if we see from 20 cm to 40 cm the swings in 20 seconds it is decreasing by 4.
Question 2.
Think back to the data you collected earlier in class for the weight and length of your pendulum. Thinking about that data and this data, does the angle where the pendulum starts make a difference? Explain your reasoning in your math journal, using numbers, words, or pictures.
Answer:
No difference,
Explanation:
Thinking back to the data I collected earlier in class for the weight and length of your pendulum. Thinking about that data and this data, the angle where the pendulum starts makes no difference, A pendulum will have the same period regardless of its initial angle.
Bridges in Mathematics Grade 4 Student Book Unit 8 Module 1 Session 5 Answer Key
Slide Experiment
Question 1.
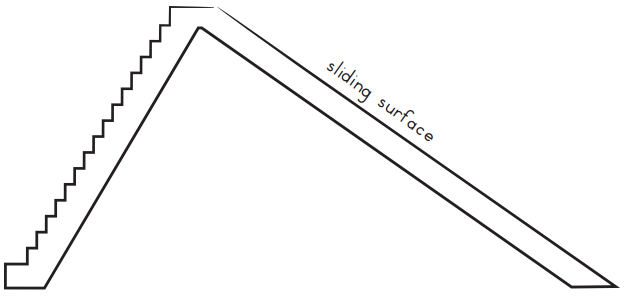
The neighborhood slide has a 30° angle where it meets the ground. Use your protractor to draw and label a side view of the neighborhood slide.
Answer:
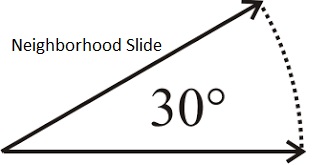
Explanation:
Given the neighborhood slide has a 30° angle where it meets the ground. Used my protractor to draw and labeled a side view of the neighborhood slide as shown above.
Question 2.
Using the 15-centimeter slide held at a 30° angle, slide a tile down the slide. Record your results in the table below, then repeat the experiment.

a. To be safe, the tile should not land more than 3 centimeters from the end of the slide. What do you predict is a safe angle? Explain your reasoning.
Answer:
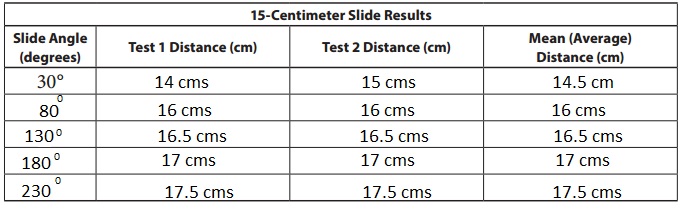
40 degrees,
Explanation:
To be safe 40 degrees is safe angle here it looks it will not slip.
b. Experiment with different angles of the slide in 50 increments, and record your results in the table above. Test each angle two times.
Answer:
Recorded my results in the table above,
Explanation:
Experimented with different angles of the slide in 50 increments and recorded my results in the table above. Tested each angle two times.
c. Which angle do you recommend so the slide is safe? Explain your reasoning.
Answer:
40 degrees,
Explanation:
To be safe 40 degrees is safe angle here it looks it will not slip.
Question 3.
Now experiment with the 20-centimeter slide to see if it makes a difference in how far the tile lands beyond the end of the slide. Use the same angles that you did for the 15-centimeter slide, and record your results in the table below.
a. Explain what you notice about this data in comparison to the shorter slide’s data.
Answer:
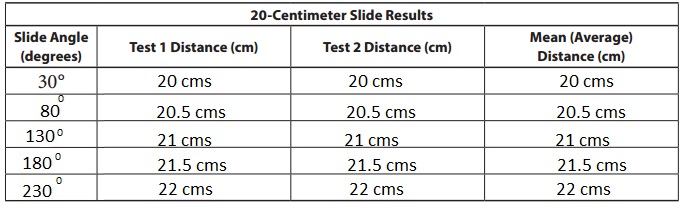
Angles increased distance also increased,
Explanation:
Experimented with the 20-centimeter slide to see if it makes a difference in how far the tile lands beyond the end of the slide. Used the same angles that I did for the 15-centimeter slide, and recorded my results in the table above noticed as angles increased distance also increased.
Question 4.
Sketch a side view of the slides that you think will keep students safe. Sketch one for the 15 cm slide and one for the 20 cm slide. Use your protractor and ruler to measure both the angle and length accurately, and label them on your sketches.
a. If the actual slides are 20 times as large as our models, how long are the real slides in centimeters?
Answer:
For 15 cm slide actual slide is 300 cm and for 20 cm 400 cm,
Explanation:
If the actual slides are 20 times as large as our models, long are the real slides in centimeters are 15 cm X 20 = 300 cm and 20 cm X 20 = 400 cm.
b. How long are the actual slides in meters?
Answer:
3 meters and 4 meters,
Explanation:
Long are the actual slides in meters as 1 meter = 100 cm for 300 cm/100 = 3 meters and for 400 cm/100 = 4 meters respectively.
Two More Slides
Question 1.
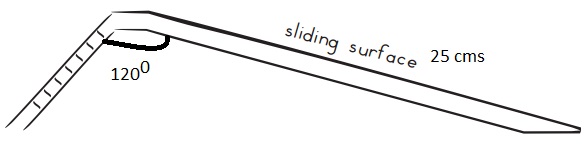
Jasmine drew a picture of a slide at a neighborhood playground. Measure the slide with your protractor and ruler.
a. What is the angle of the slide where it meets the ground?
Answer:
60 degrees,
Explanation:
The angle of the slide where it meets the ground is 60 degrees.
b. How many centimeters long is the sliding surface of the slide drawing?
Answer:
25 centimeters,
Explanation:
25 centimeters long is the sliding surface of the slide drawing.
The actual slide is 25 times as large as the drawing.
c. How long is the sliding surface of the actual slide in centimeters?
Answer:
625 centimeters,
Explanation:
Long is the sliding surface of the actual slide in centimeters is 25 centimeters X 25 = 625 centimeters.
d. How long is the sliding surface of the actual slide in meters?
Answer:
6.25 meters,
Explanation:
Long is the sliding surface of the actual slide in meters as 1 meter = 100 centimeters so 625 cm/100 = 6.25 meters.
e. What changes are needed to make the slide safer for students?
Answer:
Angle should be decreased,
Explanation:
Changes are needed to make the slide safer for students is angle should be decreased so that sliding surface becomes closer to the ground.
Question 2.
Jasmine drew a picture of a different slide from a city park. Measure the slide with your ruler and protractor. Label the length in centimeters and the degrees of the angle.

a. Is this slide safe? Explain your reasoning.
Answer:
Not that safe,
Explanation:
Slide is not that safe, its far from the ground.
b. If the actual city park slide is 30 times as large as the drawing, how long is its sliding surface in centimeters?
Answer:
750 centimeters,
Explanation:
If the actual city park slide is 30 times as large as the drawing, long is its sliding surface in centimeters is 25 cm X 30 = 750 centimeters.
c. How long is the sliding surface of the actual city park slide in meters?
Answer:
7.50 meters,
Explanation:
If the sliding surface of the actual city park slide in meters is as 1 meter = 100 centimeters so 750 cm/100 = 7.50 meters.
Bridges in Mathematics Grade 4 Student Book Unit 8 Module 1 Session 6 Answer Key
Merry-Go-Round Bars
Question 1.
Use hexagon pattern blocks to represent the space an older student needs to ride on the merry-go-round. Experiment until you find the greatest number of hexagons that can fit on the merry-go-round with each one still having an equal amount of space.
- Sketch good designs on scratch paper or in your math journal as you work.
- When you have a design that will fit the most students, draw it on the diagram below. Use your protractor to divide the merry-go-round into equal sections, and draw lines where the bars will go. The first bar has been drawn already.
- Draw hexagons in each section of your merry-go-round design to show how they fit. Use a hexagon pattern block to trace their exact size.

Legend
1 ![]() = 1 older student
= 1 older student
Part of the circle needed per student = _______________
Answer:
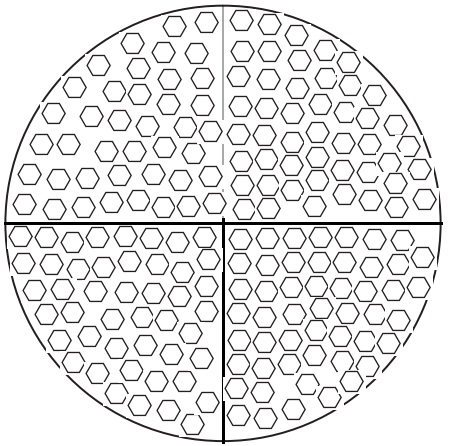
Part of the circle needed per student is approximately 1/200,
Explanation:
Drawn hexagons in each section of my merry-go-round design to show how they fit. Used a hexagon pattern block to trace their exact size. Part of the circle needed per student is approximately 1/200.
Question 2.
Use trapezoid pattern blocks to represent the amount of space a younger student needs to ride the merry-go-round. Experiment again to find the greatest number of trapezoids that can fit with each one having an equal amount of space to ride.
- Sketch good designs on scratch paper or in your math journal as you work.
- When you have a design that will fit the most number of younger students, draw it on the diagram below. Use your protractor to divide the merry-go-round into equal sections, and draw lines where the bars will go. The first bar has been drawn already.
- Draw trapezoids in each section of your merry-go-round design to show how they fit. Use a trapezoid pattern block to trace their exact size.
Legend
1 ![]() = 1 younger student
= 1 younger student
Part of the circle needed per student = _______________
Answer:
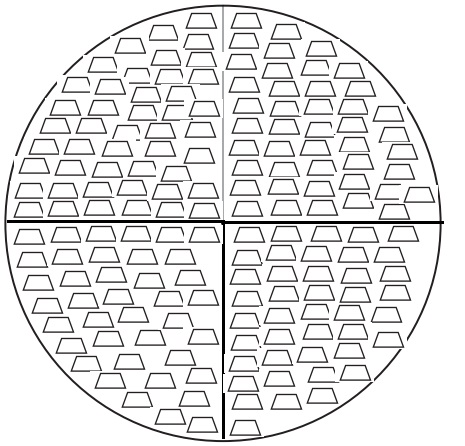
Part of the circle needed per student = 1/180,
Explanation:
Drawn trapezoids in each section of my merry-go-round design to show how they fit. Used a trapezoid pattern block to trace their exact size. Part of the circle needed per student = 1/180.
Preschoolers’ Merry-Go-Round
Use your protractor, ruler, and a green triangle pattern block to find the greatest number of preschoolers who can fit on the merry-go-round so each child has equal space.
Question 1.
Draw the lines for the bars on the merry-go-round, then fill in the legend below.
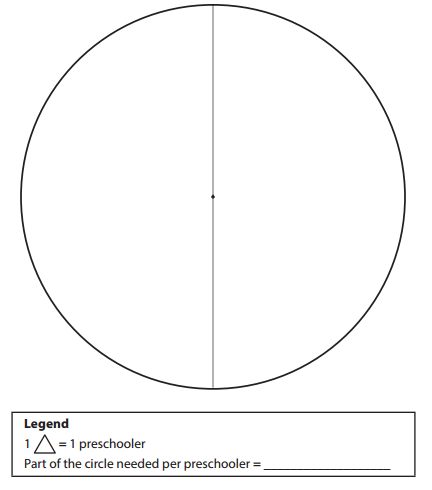
Answer:
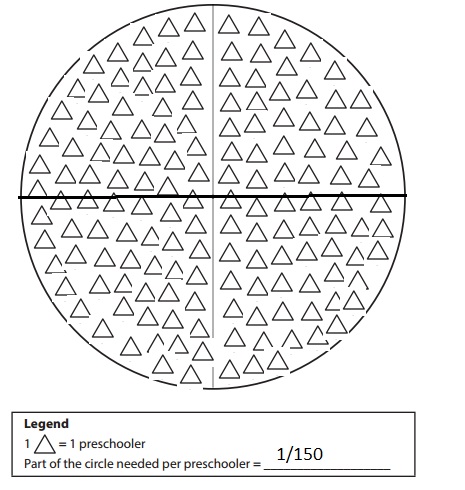
Explanation:
Drawn the lines for the bars on the merry-go-round, then filled in the legend below as part of the circle needed per preschooler is 1/150.
Question 2.
Using colored pencils or markers, symmetrically color in your design.
Answer:
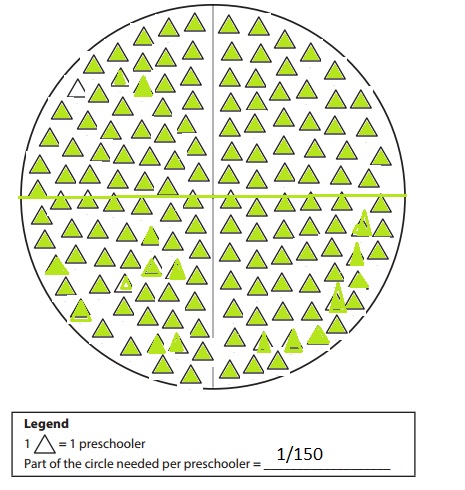
Explanation:
Used colored markers, symmetrically colored in my design above.